Friday, August 31, 2012

More mini pages

I'm still trying to get back on track after vacation. Am I the only one that needs a vacation after taking a vacation? LOL. All I can say is that it was quite interesting going to Vegas with a new 21 year old.  It was a LOT of fun, but also tiring. I did more walking in 4 days than I think I've done in 6 months. The good news is that I have some great pictures to scrapbook (when I get to them!).

For now I'm back to work on my Hawaii mini.

 
I still have some work to do on these pages. I want to cut out a little helicopter to add to the left side. We will be going on a helicopter ride during out vacation. My thought for the palm trees was that we will be able to see the tops of all of them during our ride. On the tag on the left side I will add notes about the reservation for our helicopter. I will have the date, time, location and phone number. I will also have a list of things I want to make sure to take pictures of during the ride. One tip that I read about is to wear a dark shirt so that there won't be a glare in pictures during the ride (I guess maybe because of the glass windows?) I'll make a note to remind myself.
 
I'm so glad we made it to Friday and that I have a 3 day weekend. Do you have any big plans for the holiday weekend? Hubby and I will be going to our son and daughter in laws on Saturday, but other than that I hope to spend a little more time crafting. I need to get this mini finished so that I can start on another project.


Thursday, August 23, 2012

Pages 3 & 4 of the Mini

Hello friends. I'm cruising right along with the mini. The hardest part is trying to keep it simple and not overload it. I want to be able to take it with me through out our trip so I don't want it too bulky. I want to use it strictly as a check-list/info center. Pages 3 and 4 will be used for our second day of our vacation. It will hold information about our orientation breakfast and Luau.


For these pages I used another journaling spot for the left side and one of my Cricut cuts for the flap on the right. The Beach sign was cut from Summer Vacation. 

The picture below shows the same pages, but with one of the tags for the pocket on the left side.


This is a picture of some tags I made from the paper stack. The paper was a collage of tags that I just needed to cut out. After cutting them I inked the edges and used my Stampin Up tab punch to create a tab for the tops and that was it. Easy Peasy. The orange one below is the tag that is shown in the pocket above.


I'm sure these will hold lots of notes and lists before our vacation gets here. I don't want to forget anything.

Tuesday, August 21, 2012

Mini Album pages 1 & 2

Hello and welcome back. Today I have a couple of pages from my mini to share. I haven't done a lot, but I like the way it's coming along.  Below is a picture of some of the items I cut with my Cricut Expression that I will add to my mini.


All of the cuts are from Summer Vacation except the Hibiscus and Hawaii. That cut is from Life's a Beach. I used the Hibiscus and Hawaii for the cover of my mini.


I raised it up with pop dots and used a white gel pen to create stitching lines. It was cut at 2.5". After finishing the cover I pulled out all of my stamps that had journaling opportunities on them. Below are what I found in my stash. Most of these I bought on clearance at Michael's Craft Store more than a year ago. I knew I would use them some day. Heehee.


Below is a picture of page 1 and 2. I used one of the journaling spots and two of the Cricut cuts from Summer Vacation. Under the blue flaps on each side there are openings for tags or lists that I will need. On the left side I will put my list of things to pack and I will add to this list as I think of things I need to take. On the right side I will put the confirmation numbers for the flight, the rental car and the hotel.


On each flap I added ribbon or fibers from this pack that I bought on clearance a long time ago.  I just came across this package in my stash when I was looking for something else. I like it when it works out like that.


I'll try to have a couple more pages posted soon, but no promises. I'll be on vacation celebrating my son's 21st birthday. I can't believe my baby is 21. Okay okay no old jokes! I refuse to get old. Stay young and craft on!
Cindy

Friday, August 17, 2012

Mini Album Instructions

Hello and happy crafting. Today I thought I would back up a little and give some directions for my Hawaii mini album. I don't have a youtube account and I've never made a video so I'm going to attempt these instructions with pictures.
Here is a picture of the envelopes I used.


The envelopes are made by Recollections and are 4.1" by 9.5" in size.


I used 8 envelopes for my mini, but you could use more or less. The first thing you need to do is seal the envelopes.


After sealing the envelopes you will need to cut off a thin piece from each end. This will allow each end to be an opening for a tag.


After making your openings you will need to score the envelopes at 3 1/2" and fold.


On the short end of the envelope you will attach some strong adhesive. I use Terrifically Tacky Tape. It should be about 1/8th of an inch from the edge so that there will be a little give at the binding. This short end will be attached to the back side of another prepared envelope.


This next picture shows my envelopes that have been put together and have decorative paper attached. The bottom 2 envelopes that have been adhered together demonstrate where your pockets will be located.


After preparing all of my envelopes and sticking them together I cut blue cardstock to make my flaps. The blue cardstock is cut at 6" x 4" and scored at 3 1/2". This piece has the longer end slid into the short half of the envelope on the back side and then folded over to the front. (I hope this makes sense)


This picture shows the back side of the first envelope and where the blue piece will go.


This is a side view showing the blue flaps adhered to the envelopes.


Here is a picture from above that shows how the flaps fold around to the front of the pages. When you open a flap there is a pocket inside.


The first and last envelopes are attached to chipboard to create the front and back covers.


I added one last flap to my front pocket and my mini album is complete other than the decorative papers and embellishments.


The paper I used is Surf's Up by Recollections. I also picked up a pack of solid cardstock to go along with it. I cut each of the pieces 1/4" smaller than the sections of the envelopes so that the pink edges of the envelopes would show.


I hope my directions are helpful and not too confusing. If you have any questions please feel free to ask. There are a lot of videos on YouTube that I followed. The one that helped me the most is by Follow the Paper Trail. Here is a link to that video if you'd like to watch it: http://www.youtube.com/watch?v=ekF2IDb9cHY

It really is an easy album and fun to make. I will definitely be making more. I will be back in a couple of days to show some of the inside pages as I get them finished. Thank you for looking, Cindy

Wednesday, August 15, 2012

Hawaii Mini Part 1

I finally have a couple pictures of the mini album I have been working on. It's still not finished so this will have to be a multi part post. So far I have my envelopes all glued together and a piece of chipboard for the front and back covers. I've chosen my papers and adhered all of the base pieces onto the envelopes. This is a picture of the front cover. I will use my Cricut and Gypsy to cut out a title that says Hawaii from the Life's a Beach cartridge.


On the inside...


On the left side there is a pocket for a tag and the left side has a flap the opens to reveal another pocket space.


This first page will have a title that says Pack Your Bags. Inside the pockets I will put a list of things I want to remember to pack.  This book will be used as a check list for me. I will put all of my lists for things to pack, schedules of activities, pictures I want to take and any reservation numbers among other things.
I'll be back in a few days with more pages. Thank you for visiting.

Monday, August 6, 2012

The Toilet Cut!

Hello friends. I have a surprise for you today. It's a toilet! Who woulda thunk it? I never thought I would be making a card with a toilet on it, but you know, I actually like it. I'm pretty sure I'll use this cut again.


This one will go out to my sister that has been having a hard time lately. Hopefully it will bring a smile to her face.


So what do you think? Did I do the toilet proud? Heeheehee.

Cartridge used:
Cricut Circle Exclusive Something to Remember
Toilet and embellishments cut at 4"

Saturday, August 4, 2012

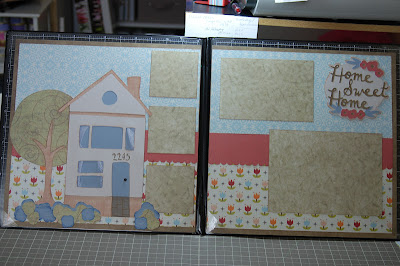
Home Sweet Home layout

Today I received my Cricut Circle Exclusive cartridge. I am still in shock that it arrived so fast. I just renewed my membership on Wednesday and now 3 days later I already have my cartridge to play with. Things didn't start out so well though. I decided to update my Gypsy last night and it got stuck on the loading screen. It took me almost 6 hours of trying different things to get it to work. By the end of the night she was back to working order, but all of my projects were lost. The file for my house warming invitations is now gone. It wouldn't be a big deal except that I'm not done with them and I don't remember all of the details. At least my Gypsy is working.

Okay, back to my cartridge. As I was looking through the book I could think of a lot of uses for this one. I really like the font, but I think I'll like it a lot more once I can use it on my Gypsy and weld the letters together. There are so many things I will use, such as: Potty Training, New Baby, First Tooth, First Step, New Driver, First Day of School and the list goes on. There really are a lot of things on this cartridge. And to have a font is a big extra for me. I love fonts.

Since I'm in New Home mode these days that's what I started with. The background papers are all (3) from Piggy Tales Thumbelina Collection that I bought last year. All of the other papers are from my stash of old papers.


I haven't taken my pictures to be printed in a really long time so I had to print pictures at home for this layout. I have so many pictures to print that I think I need to wait for a big sale. Here's the layout with pictures:


And a close-up showing Khloë looking out the window.


And because I like to think I learned something from my Gypsy crashing last night, I am going to add details about the cuts on my blog from now on. LOL

Cartridge: Something to Remember
House, tree and bushes cut at 10"
Title/Phrase and matting cut at 4"

That's all folks. Super easy and not very many cuts. The hardest part was picking papers. Thanks for stopping by and visiting with me.

Friday, August 3, 2012

Happy Friday Everyone!

I was feeling guilty for not adding anything to my blog in awhile. I've been doing some crafty things, but nothing is completed yet. I'm still working on the House Warming invitations and a paper bag mini. The paper bag mini is coming along and hopefully I'll have enough done today that I can post a couple of pictures of my progress later.
For now I wanted to wish everyone a happy Friday and a wonderful weekend. I'll be back soon with something crafty.

Blessed are the children of scrapbookers, for they shall inherit the scrapbooks.