Showing posts with label Create a Critter. Show all posts

Monday, February 10, 2014

Somewhere Sunny Layout

Can you believe I have a two page layout to share today? It's been so long since I've actually scrapbooked anything. I really missed it and even though my scraproom is still a mess I had to get a layout done.
I also took the opportunity to try out the Cricut Craftroom because I needed to link my cartridges. I am a die hard Gypsy user so I've never used the Craftroom to cut anything. Linking my cartridges from the Gypsy went exceptionally well and only took a minute. I was surprised at how easy it was, which was one of the reasons I decided to go forward with my experimenting.


Everything was going just fine and dandy until I needed to resize my letters. From what I could tell there are maybe three different places you can size things on the Craftroom. 1.) at the top of the screen. 2.) on the bottom where the default size is located and 3.) on the left hand side either under text or image. This is where I lost all hope. I somehow figured out how to resize my first word. It seemed to work fine. Then I needed to resize the second word to match. I went to the top and tried it. When I put 2" in the box it changed the size, but it was not the same as the first word. I went to the side and tried it. I couldn't do anything under the text tab, so tried the image tab. Again I put in 2" and my two words were different sizes.  I knew the bottom default wouldn't work for existing text. At this point I deleted the words, selected 2" for the default size and retyped my text. That seemed to work. I was even able to figure out how to squeeze the letters closer together and weld them.


I'm sure it's just me and the fact that I don't know what I'm doing with this program, but I have to say I still LOVE my GYPSY! I really hope the new Design Space works more like a Gypsy than the Craftroom.

And here is the finished project (a few gray hairs later).


We had rain all weekend so I really wanted to work on pictures with a warmer feeling. These pictures did the trick because they were taken on a day that the temperature was over 100 degrees and we were wishing it was somewhere around 75 degrees.
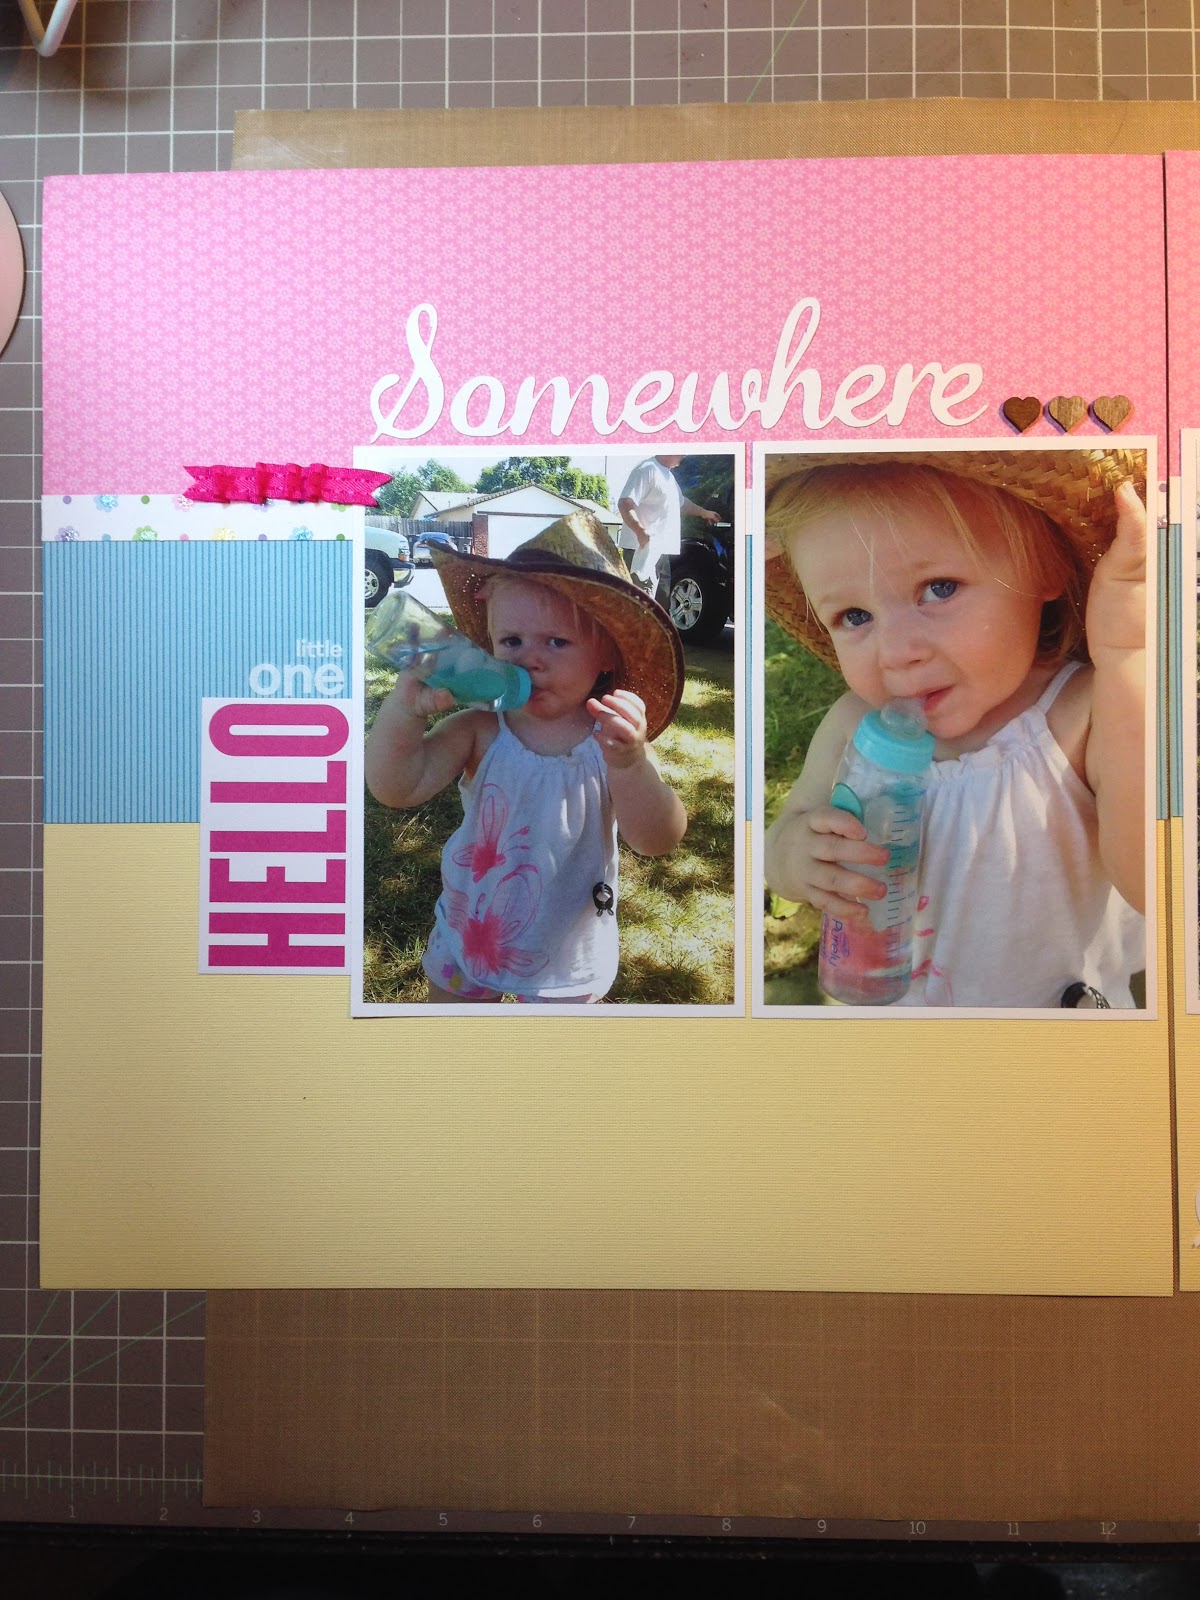

I added the little dog to the bottom right corner because we were at a petapalooza that day and saw a lot of different breeds of dogs. The dog is from the Create a Critter cartridge. The font for the title was cut using Quarter Note and welded together.


Monday, February 18, 2013

My Life Monday - week 5

Do you ever feel like time is just flying by? That's how I feel lately. Maybe it's because we've been so busy lately. I just can't believe we're more than half way through February already. This is one reason I'm glad I've been documenting our lives with Project Life. Even though I'm only on week 5 I like to look back and remember the things we've done and also remember the days we didn't do much of anything.

It took me a little longer than I expected, but I was able to get week 5 completed. I had to add a couple extra pages because I couldn't narrow down the pictures any further. These two pages were the first three days of our vacation. We had rain and sun each day.


My title card was made using the Art Philosophy cartridge and Pack Your Bags for the palm tree, cut at 3.75".

The turtle was cut from Create a Critter at 1.50".

On the right side page I used Quarter Note for the Happy Anniversary, cut at 1".

The next two pages take us through the end of our vacation. We went on a helicopter ride, to a Luau and snorkeling with a sea turtle.


The helicopter was cut from Boys will be Boys at 3". The clouds were cut from Create a Critter at various sizes.

The hula girl was cut from Life's a Beach at 3.8". The little crab was cut from the same cartridge at 1".


This cute little sea turtle was cut from Pack your Bags at 3".

The fancy umbrella drink was cut from Pack your Bags at 4".

Unless I lost count I think that makes 6 cartridges used for these pages. I love that so many of the cartridges work well together. See you next time. Cindy


Thursday, July 19, 2012

House Warming Invitations

I'm back with another House Warming item. My son and daughter in law should be closing on their house on August 8th. I am so happy and excited for them. (I think I've said that a dozen times!)

I was watching YouTube videos a few nights ago (this is my nightly ritual lately) and I came across a stair step card that someone was making for her realtor. I fell in love with it and thought it would be perfect for an invitation for a house warming party. Here is a link to the YouTube video http://www.youtube.com/watch?v=hE8IEKc-eig if you'd like to take a look. I also saw a similar card on Pinterest that was made for a housewarming party. That one was made by Sharon White at http://www.sharonsscrappyspace.com/2012/05/house-warming-card-tutorial-now-available.html .

I used papers to match the color of my son and daughter in laws house and I left off the fence because they don't have a fence in their new front yard.


For the trees I used two different cartridges. The middle tree is from Just Because Cards (I bought this cartridge just for that cut because I LOVE it). The other two trees were cut from ? (I'll have to double check that) The house was cut from Create a Critter. I didn't like the windows the way they were so I hid them with my Gypsy and used hearts from the George cartridge instead. I also made the house a little skinnier and taller with my Gypsy. The sold sign is from Freshly Picked. I added a piece of white card stock on top of the sign and stamped 'Sold' with letter stamps from Close to my Heart. It's a Party is also a stamp from Close to my Heart. The grass was made by using the Martha Stewart Icicle punch. The little flowers are from an old punch that I got from Creative Memories.


The party information is hidden in one of the valleys of the card.


So far I have 6 done and about 20 more to do. It's a good thing they are super simple to make.  If you have any questions please feel free to leave me a comment.

Thank you for looking. Cindy

Thursday, December 29, 2011

Penguin Gift Bags

I'm back with another Penguin project we made for Khloë's birthday party. I hope everyone had a wonderful Christmas. We had so much fun watching Khloë open her presents. Of course one of her favorite things was a box. She sat inside it while her Uncle pushed her around like a car. She was all giggles. Another favorite of hers was my sisters cat. I wish I had gotten a picture. My sisters cat is the most docile thing I've ever seen. He's this big boy cat that walks around the house with clothes on. Khloë pulled on his clothes, pet him (not very softly) and put her fingers up his nose. He just laid there and let her do it. Then she decided to ride him like a pony. Luckily I was close by and kept crazy kitty from getting smooshed. As I pulled Khloë off of him he still just laid there! Then she wanted to give him kisses right on the big ol' kitty smacker. No problem. Nothing bothered him. I'll try to have my sister send me a picture of him so I can post it.
Back to my project of the day.


Sorry for the poor quality of the picture. I took it with my cell phone and forgot to get one at the party with my real camera. I used Creat a Critter for the penguin to match all the other decorations. I ordered the skinny bags from Stampin' Up after someone on the Cricut Message Board let me know where to get them. Love them! The jelly beans are from the Jelly Belly Factory. We're lucky enough to have one in our city. Any and every kind of jelly bean you could ever want. They even have a new flavor called baby wipes. Trust me - don't try it. They taste exactly the way you think they would and you can't get the clean baby powder taste out of your mouth for the rest of the day. Not good.


Here is another picture with some more penguin bags and some that say Khloë on them. I got really tired of making penguins after awhile, even though I think they are the cutest little critters ever. I used Hello Kitty Font to cut out Khloë and Art Philosophy to cut out the background to attach the name.
Have a wonderful day. Cindy

Thursday, December 22, 2011

Birthday Cake

First thing I have to say is a great big THANK YOU to my sister for making such an awesome cake for my little grand-daughters first birthday. She used the same penguin from the Create A Critter cartridge and tied in all the same colors as the other decorations.


The cake was so cute I didn't want to cut it. In the end we took the top layer off and cut the bottom layer. It was as yummy as it looked. Over the next few days I'm hoping I can post some pictures of the other decorations and favors. Somehow I didn't take close-up pictures of some of the things at the party so I'm hoping my daughter in law has some on her camera. Check back later. Cindy

Tuesday, December 20, 2011

Penguins everywhere!

I have made so many penguins lately that it's time for a break. They are very cute, but those little feet and beaks are torture to glue on one by one. I thought I would share the way I put my pieces together after cutting them out with my Cricut.

I was cutting out 15 penguins at a time. I like to leave all of my pieces on my mat while I work so that I don't lose any of those tiny feet or beaks.


You can see in the picture above that I leave the back layer of the penguins attached to the mat and glue the other layers right on top. This helps hold the pieces still while I work and nothing gets lost.

And here are some of the finished penguins.


We used penguins for toppers on the party favors, on toothpicks for finger foods, the banner that I already showed and also for the birthday cake. I was very pleased with everything matching and because we're having such cold weather lately the penguins with their cute little scarves are a perfect theme.

Friday, December 9, 2011

Birthday Banner

I just have to say 'I LOVE MY CRICUT!' Before having my Cricut I would have never been able to make such pretty personalized things. I'll admit that I spend a lot of money on my Cricut habit, but it also saves me a lot of money. Take for example this banner. If I wanted a birthday banner before having my Cricut I would have bought one. It would have cost me more money and it wouldn't have looked as nice. It also wouldn't be personalized with Khloë's name or have the perfect pink color and her favorite penguins.


I still need to add some more tulle and make it a little fluffier (LOL), but you get the idea. This was my very first time making rosettes too. I think I'm hooked. It was so fun. I want  to add rosettes to everything now.


For the font I used the Monogram setting on the Gypsy Font. I really like the swirly cut-outs in the letters so that you can see the background color. The scallop triangle banners were cut using Birthday Bash. After cutting the pink triangle pieces I ran them through my cuttlebug and embossed them with dots.


Khloë likes penguins and they are the theme for her birthday. I found the cute little penguin for her banner on the Create a Critter cartridge. One of my favorite cartridges. There's a critter for every occasion.

Next I'll be making some party favors, but first I need to make a trip to the Jelly Belly Factory for some pink, black and white jelly beans. Have a great weekend everyone. Cindy

Sunday, May 22, 2011

Create a Critter cards

Happy Sunday everyone. It's a lazy day for me today. The house is quiet and the wind is blowing outside. My plan for today is to come up with some calling cards for the Northern California Circle Event next month. I'm having such a hard time finding an image that speaks to me that I can put on a 3x3 square. So here I am on the computer. I'm gonna look for some inspiration on the Cricut messageboard. The problem with that is that I usually end up spending all my time on the message board and don't get anything done.
So, while I work on my calling cards I'll share a couple of cards I made last week. I used Create a Critter for these. I'm not sure what size the cuts are because they were left over from other projects. I had them sitting on my desk for a few months now and finally decided to make some cards with them. Super easy.
This first card will be for one of my nephew's birthdays.

This little skunk card will go to one of my nieces. I have a lot of nieces so I always have to have cards ready. Have a wonderful day and I'll see you back here soon. Cindy

Sunday, April 24, 2011

Easter Baskets

I made new Easter Baskets. They turned out much cuter than my original try. I used the Create a Critter cartridge for the cute bunny. I still used the coffee cans. Added some Stampin' Up paper for the background and the grass. Then I added the little bunnies and candy.
Happy Easter everyone.

Thursday, February 3, 2011

Rain Rain Go Away

Okay, so I really need some opinions on this one. It looked much better in my head. I thought the Happy Hauntings font might look like rain coming down, but now I'm not so sure. I also used my favorite cartridge, Campin Critters, for the animals needing life rafts due to the flooding. With all the rain we were having awhile back I felt like we could be washed away and might need row boats to get around. Luckily our weather has gotten a lot better, but I know in some parts of the country the snow is relentless. I hope everyone is safe and warm. I'm not very fond of cold weather, so I can't even imagine how it must be to live where it snows. I'm cold just thinking about it. Stay warm everyone.   
Cut sizes: The Duck in the life preserver was cut at 2.5", the Skunk in the boat was cut at 3" and the tree scene was cut at 6.75". The title was cut at 2" using the Happy Hauntings cartridge. The half circle behind the tree scene was cut at 12" using George and the clouds were cut from Create a Critter at 3-3.5".

Wednesday, September 29, 2010

Goodie Bags


Yay, I got the goodie bags ready for the baby shower. I used Create a Critter for all the animals. They are layered on a green background that was cut out of the Cricut Storybook cartridge. The clothespin that is holding the bags closed will be used for the clothespin game during the shower. Inside the bags I will add some candy treats, a pen with the baby's name and the other games that will be played during the shower. There will be a word scramble, baby bingo and a couple of others. I am so excited for this weekend. The mommy to be has no idea about all of the things I've put together for her and I can't wait to see her face when she walks in the house.

Thursday, September 23, 2010

Hippo Birthday Card

I love the Create A Critter cartridge. This is a super simple birthday card I made using the Hippo from the cartridge.

Saturday, August 28, 2010

Who's Chicken Now?


This was a funny day. My niece Jasmine came over to visit and hubby decided to teach her how to cook a chicken. He had taught her how to make salsa awhile back and now it was time to learn something new. Jasmine was not happy about this new venture. She wouldn't even touch the chicken. Mike gave her some gloves to wear, thinking this might help. Well, as you can see by the pictures, the gloves didn't help. She didn't want to look at the chicken and she certainly didn't want to touch the chicken. Eventually Mike took over and got the chicken cooked. If we had waited on Jasmine we may have starved to death.
For this layout I used a few different cartridges. For the barn I used Create a Critter, for the chicken I used Animal Kingdom and for the title I used Lyrical Letters, Loop Dee Loo font.

Tuesday, July 20, 2010

Giraffe from Create A Critter


Yay, I got a little bit of time to work on another card. This one is also from the Create A Critter cartridge and I also used the Martha Stewart Icicle border punch for the grass again. I think this giraffe is one of the cutest critters on this cartridge (I think I say that every time I cut out any of the critters). I love the sunglasses. I wanted to make this a card for my niece though, so I decided to add bows and make it a girl giraffe. I cut the bows from the poodle and they worked perfect.

Monday, July 19, 2010

Create a Critter Zebra

 
Hello everyone. Sorry I have neglected my blog in the last week or so. Things get a little hectic sometimes. I've had lots of things running through my mind that I want to make, but finding the time is not always easy. Luckily the Create a Critter cartridge is so easy to cut and put together, I was able to get this card done in just a few minutes. The Zebra and flowers were cut at 3 inches. The grass is actually punched out from the Martha Stewart Icicle border punch. I was in a hurry and didn't have enough time to search for grass on my Cricut cartridges so I grabbed what I had close. I think it turned out okay though. What do you think?

Saturday, June 12, 2010

Create a Critter Birthday card


I have been busy today making a birthday card and also a 2 page layout. The card was made with the Create a Critter cartridge. This cute little piggy was cut at 3 1/2 inches. The Happy Birthday stamp is from Paper Trey.

Thursday, June 10, 2010

Create a Critter Grad card


The Cricut Create a Critter cartridge has some of the cutest cuts on it. I quickly made this graduation card using the Create a Critter Dinosaur cut at 3". The grass is cut from Paper Doll Dress up at 4" wide. The Grad cap is from Hello Kitty cut at 5 1/2". Diploma on the inside of the card is cut from Hello Kitty at 1 1/2". Congrats is cut from Wild Card at 3.75". I am having so much fun with these new cartridges. Stay tuned for more. Thanks for looking.

Monday, May 24, 2010

Wise Owl

This is a graduation card for my sister. She will be graduating from college with a degree in child care. I used the cuttlebug embossing folders, Create a Critter cartridge for the owl and the Hello Kitty cartridge for the graduation cap. I used the paisly patterned paper to make my owl a little more girly.

Saturday, May 22, 2010

Butterfly


LID Challenge #2 for the week. For this layout I used the Gypsy font for wings and butterly words. For Jordan I used Alphalicious. The butterly is from the new Create a Critter cartridge. I love this picture because it shows my niece during that time in a girls life when she is quickly changing from a kid to a young lady.

Wednesday, May 19, 2010

Create a Critter Bunny card

This was a super simple card to assemble. I used a couple different color cardstock papers on the background, used a Martha Stewart border punch on the top and added a little ribbon. After the base was put together I just added a sentiment from my PaperTrey stamps and stuck my bunny on the top. The Create a Critter cartridge is very easy and quick to use. It has the cutest little animals on it and once they are put together they feel like chipboard because of the layers. I highly recommend this cartridge.
Blessed are the children of scrapbookers, for they shall inherit the scrapbooks.