Showing posts with label Layouts. Show all posts

Thursday, February 13, 2014

It's Magic layout

The pictures on this layout aren't the best quality. In fact some of them are just down right blurry, but I love the expression on Khloë's face, especially in the last picture.


When my son and his family moved into their first home Khloë was just a year and half old. She had fun checking out all the cabinets and finding which one's she could hide in. The one in the kitchen corner was her favorite.


The first time I saw her go in the cabinet I asked her what she was doing. She just looked at me with that little smile, like to say, "Watch me. I'm going to disappear now".


Of course I played along and said, "Where's Khloë? Where's Khloë?"  She popped the door back open and jumped out laughing. She was laughing so much it was hard to get a good picture.


The last picture is the blurriest, but it's also my absolute favorite. Even with it being such a bad picture you can see how much she was laughing. That is pure joy.


Tuesday, February 11, 2014

Summertime Layout

Summertime. Doesn't that have a nice ring to it? I think I might make this my new process. I'll scrapbook summer pictures in the winter and winter pictures in the summer when it's 100 degrees.

These pictures were taken when my son and his family moved into their new house. It had been empty for a few months and the lemon tree was loaded with ripe lemons. Khloë thought it was fun to peel them open and pull out the pieces. She was even brave enough to try one out. As you can see she wasn't so sure about the sour taste. The funniest part was that she kept trying it and making these funny faces.


The title on this layout was cut using the Suburbia font at 2" on the Cricut Expression.


The lemon is from the Preserves Cricut cartridge. I think I've had this cartridge for two years and I just now took it out of the plastic. I knew it would come in handy at some point.

Monday, February 10, 2014

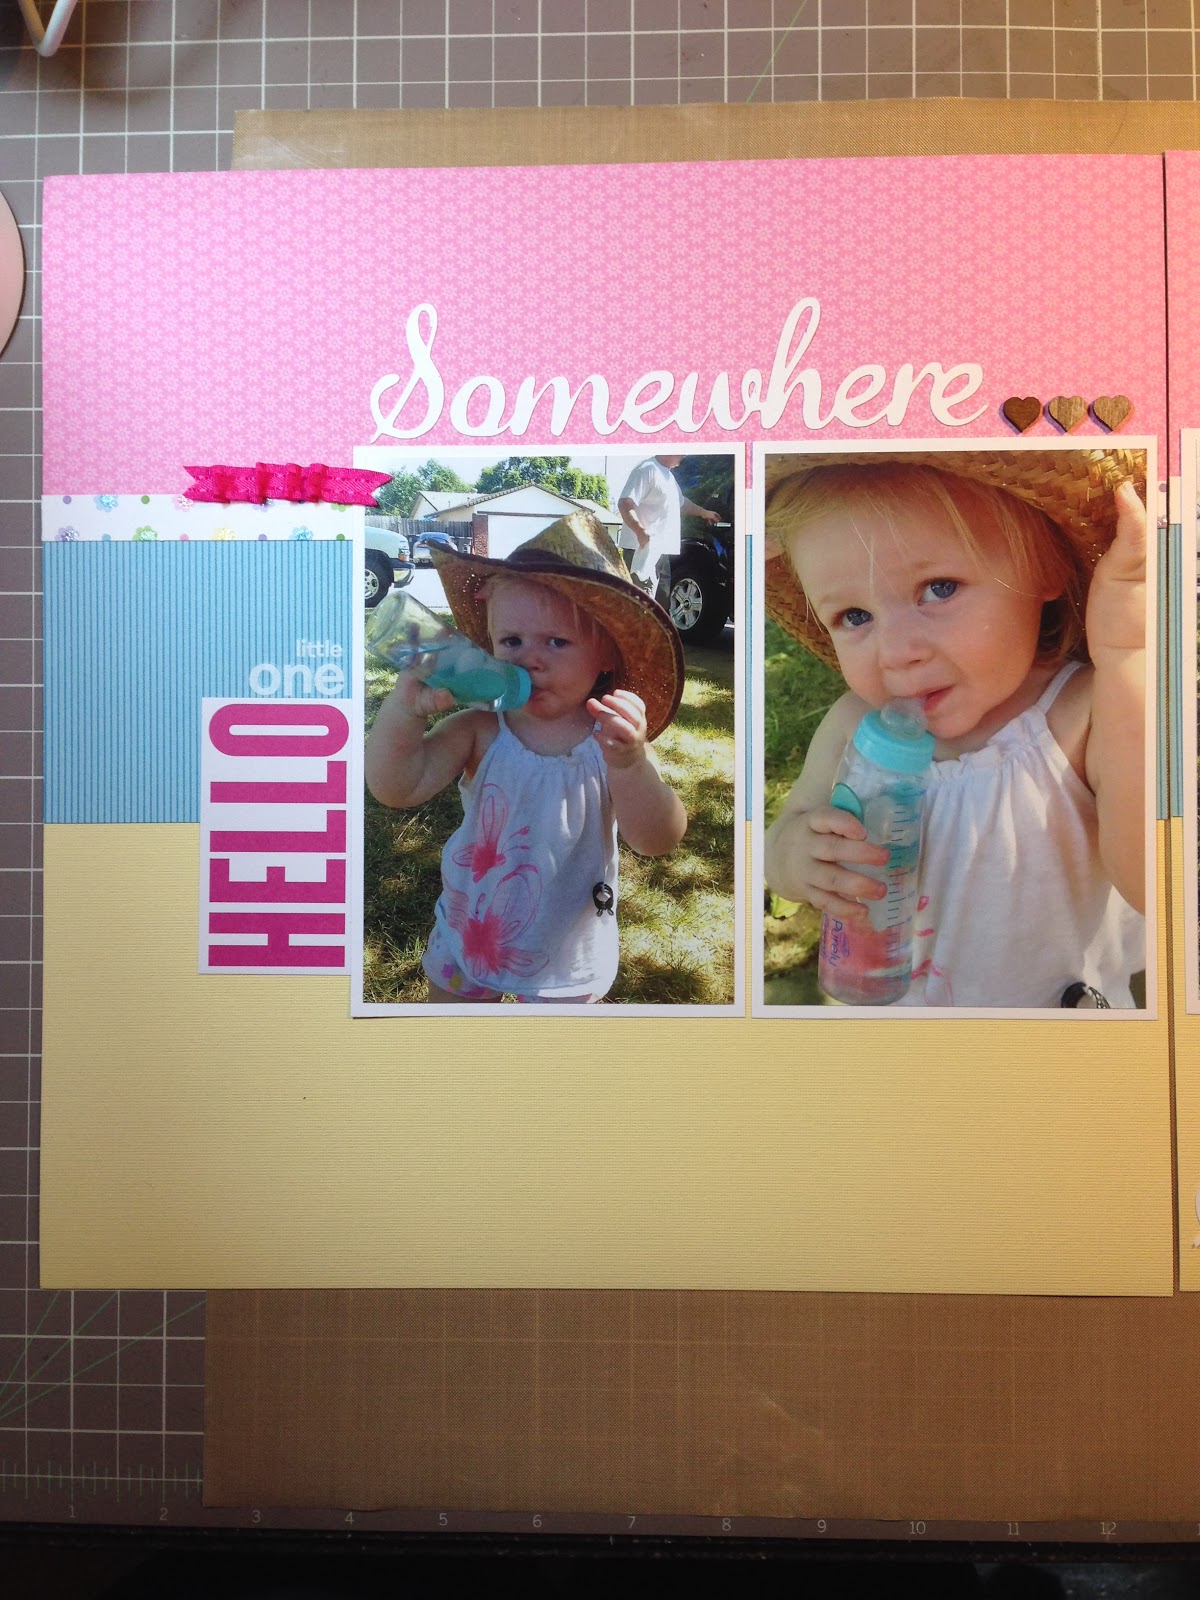
Somewhere Sunny Layout

Can you believe I have a two page layout to share today? It's been so long since I've actually scrapbooked anything. I really missed it and even though my scraproom is still a mess I had to get a layout done.
I also took the opportunity to try out the Cricut Craftroom because I needed to link my cartridges. I am a die hard Gypsy user so I've never used the Craftroom to cut anything. Linking my cartridges from the Gypsy went exceptionally well and only took a minute. I was surprised at how easy it was, which was one of the reasons I decided to go forward with my experimenting.


Everything was going just fine and dandy until I needed to resize my letters. From what I could tell there are maybe three different places you can size things on the Craftroom. 1.) at the top of the screen. 2.) on the bottom where the default size is located and 3.) on the left hand side either under text or image. This is where I lost all hope. I somehow figured out how to resize my first word. It seemed to work fine. Then I needed to resize the second word to match. I went to the top and tried it. When I put 2" in the box it changed the size, but it was not the same as the first word. I went to the side and tried it. I couldn't do anything under the text tab, so tried the image tab. Again I put in 2" and my two words were different sizes.  I knew the bottom default wouldn't work for existing text. At this point I deleted the words, selected 2" for the default size and retyped my text. That seemed to work. I was even able to figure out how to squeeze the letters closer together and weld them.


I'm sure it's just me and the fact that I don't know what I'm doing with this program, but I have to say I still LOVE my GYPSY! I really hope the new Design Space works more like a Gypsy than the Craftroom.

And here is the finished project (a few gray hairs later).


We had rain all weekend so I really wanted to work on pictures with a warmer feeling. These pictures did the trick because they were taken on a day that the temperature was over 100 degrees and we were wishing it was somewhere around 75 degrees.


I added the little dog to the bottom right corner because we were at a petapalooza that day and saw a lot of different breeds of dogs. The dog is from the Create a Critter cartridge. The font for the title was cut using Quarter Note and welded together.




Wednesday, November 13, 2013

Friends and Photos Layout

During my grand-daughters birthday party I want to get a picture of each of the kids that I can print out and send home with them. I will also print a copy for her birthday album. This page will be the beginning of that section of the album. The font is from Mickey Font, cut at 1 inch. Minnie Mouse is from Mickey and Friends, cut at 6 inches.


I'm hoping to have a cardboard cut-out of a Minnie/Mickey head with the center cut out so that the kiddos can hold it up and put their faces through the middle for their picture. The film strip is from Mickey and Friends, cut at 6 inches wide.


I also want to capture the penmanship of the kids so I will have one slot for their picture and one for their name that they write themselves or a handprint if they are too young for writing. Heart that Mouse is cut from Mickey and Friends at 2.75 inches.

Monday, November 11, 2013

Another Minnie mini Layout

Another layout for the Minnie Mouse album. I am loving these big polka dots. I used the Mickey Font cartridge again for the word Minnie, cut at 2.75 inches. The flowers were made using Stampin' Up punches.


I'm only a couple of pages in and I already love this album. As I'm making it I'm getting ideas for decorations and props for the party. More on that in another post.

Friday, November 8, 2013

Minnie Mouse Layout

I'm starting a Minnie Mouse mini book for Khloë for her 3rd birthday. Hopefully next summer we'll be able to make a trip to Disneyland so she can see the real thing.

I went to the local scrapbook expo over the weekend to search for paper and ideas. I found out real quick that most Minnie items are made using the traditional Mickey colors with Red, Yellow, black and white. I picked up a couple of the traditional colored page kits and used them for ideas.


I think it's so much cuter in pink.


I used the Mickey Font cartridge for the word Mouse and for the Minnie head with bow. For the little tags I used a Close to My Heart alphabet stamp set.

Wednesday, November 6, 2013

Happy Christmas Layout

I don't know about you, but Christmas is coming way too fast for me. I can't believe we're already in November and Thanksgiving is only 3 weeks away.  As much as I love shopping I'm not ready for Black Friday. I don't have a clue what I'm buying for anyone. Can we just slow down time and add a few more hours to the day? Or at least a few more hours to the weekends?

Today I have a single 12x12 page. I have always liked this Christmas tree on the Christmas Solutions cartridge and it's the reason I bought the cartridge. I cut the tree at 8 inches. The title was cut at 1.5 inches.


When I look at these pictures they make me smile. I was watching Khloë one evening while my son and daughter-in-law went to a company Christmas party. We decided to go to the grocery store for some goodies and she insisted on picking out her own outfit. Don't you just love the rain coat and spring hat together? And yes, she wore it all through the store! It was neither sunny outside or raining. LOL.

Friday, October 4, 2013

The Great Outdoors

Another camping layout. Somehow I forgot to post this one a few weeks ago. Now that the weather is turning colder I sure miss the days at the lake. I love fall weather, but realize winter is just around the corner and I'm not a big fan of winter.


Wednesday, October 2, 2013

Learning to walk - Layout

Time is just flying by, isn't it? I sat down to do a little scrapbooking and realized I have done very little with my 2012 photos. Luckily I do have most of them printed and in a Project Life album so I can page through and pick out my favorites to put in a layout. The pictures here are from January 7th, 2012. Khloë had just turned one a couple weeks earlier and was still testing her walking skills.


I got into the habit of counting steps every time I would see her start out. At this point she was up to 10 steps in a row. I love that she was wearing a Hello Kitty shirt and the two Hello Kitty Cricut cuts were perfect. The first one totally reminds of Khloë walking and being a little off balance. The second one is how she ended up after 10 steps... on her bottom. The font is from the Hello Kitty font cartridge.

Monday, September 9, 2013

Row row row your Boat

Another kayaking layout. Yes, I take a lot of pictures. LOL.


Update: I added a couple more things to the layout because it looked too plain to me. Here's the updated picture:


The kayak we rented was for two people and as you can see from the pictures we added an extra picture. Part of the fun was being worried that we were going to tip over or sink! My niece, nephew and son had a lot of fun working together at paddling.


The letters were all cut with the Cricut cartridge When I was a Kid. The kayak and paddle were cut from the Camp Out cartridge.


Friday, September 6, 2013

Beach Day

Our first time riding in a kayak and we had a blast. It was so much fun spending the day with the family.
 

For the lady in the inner tube I used the Fun in the Sun cartridge by Cricut. The letters for Safety First and Beach Day were cut from the new Cricut cartridge called When I was a Kid.


The background paper on this on this double layout was made using plain blue cardstock and then I used a background stamp to make the darker blue dots. This was the first time I've made my own background paper and I think it adds a little something extra to plain paper. It's not perfect, but that's okay.


The striped paper, yellow and red papers are from Simple Stories and the solid cardstock are from Stampin' Up.

Thursday, September 5, 2013

A camping we will go...

I finally got some layouts done. Boy, it has been a long time. I really do miss scrapbooking and wish I had more time for it. I also enjoy having a pack of coordinated papers so I don't have to think about things matching. For this layout I used a pack from Simple Stories.


I think I need to add something to the right side, but I didn't want to cover up the boot prints on the paper. Hmmmm, I'll have to play with it a little more tonight. The cute little Boston Terrier belongs to my sister. Her name is Lily Lou Bug. Isn't she adorable?


All of the papers and embellishments are from Simple Stories except the solid background and the picture mats. Those are just pieces from my stash.

Friday, July 5, 2013

All Smiles

Is there anything better than baby smiles and giggles? I think not. I only hope I can get some pictures of the baby smiling. Our first grand-daughter was always so serious when she was a baby. It was hard to get a picture of her smiling. Even when I thought I got one I would find out later, after getting the pictures printed, that I didn't get it.

Here's the layout.


I added the little butterfly from a Stampin' Up punch and added a sentiment to the middle of the banner.


Still more to come from this cartridge...

Wednesday, July 3, 2013

Sweet Girl Layout

Another layout from the Cricut First Few Years Cartridge. These layouts come together very quickly once you pick the papers you want to use. All the sizes are listed in the cartridge booklet.
 

I have a few more to make with purple and gray and then I'll switch to some other colors for our first grand-daughter. I might even go back and work on my son's baby album that's not finished yet. (he's only going to be 22!)

Here's a close-up of all the pieces in the lower corner. I added some pearls to the dress.


Come back for more layouts soon. Happy 4th everyone.

Tuesday, July 2, 2013

Announcing - The First Few Years

I have a layout posted over on the Cricut Fanatics Blog today. Please check out the full post over there.

I recently purchased the new Cricut cartridge The First Few Years and I am loving it. I started with the very first project and cut all the pieces exactly as the booklet suggested. Here is my finished layout.


Every piece on the layout was cut using The First Few Years cartridge except the butterflies which were made using a couple of punches by Stampin' Up.

I will have more layouts from this cartridge that I will be posting over the next few days. I hope you like lavender and gray. LOL.

Monday, June 3, 2013

A Wish Came True

I was a guest designer over at the Cricut FANatics blog yesterday and this is the layout I shared. Stop by their blog and check out all the wonderful projects and tips by the designers.

My Grand-daughter. I'm not sure what she wished for, but I know that ours came true the day she was born.


The title was made using the Storybook cartridge cut at 3". The shape under the title was also cut from the Storybook cartridge at 4". The dandelion was made using the Creative Memories Cheerful Seasons cartridge at 3 1/2". All of the papers are from Close to my Heart.

I hope you like the layout. Don't forget to get out your older cartridges and put them to use.

Sunday, May 12, 2013

Concentration Layout - NSD #7

I love this picture of Khloë at gymnastics class. She was concentrating so hard on that balancing beam. I chose this picture to make a layout for the National Scrapbook Day challenge on the Cricut Circle message board and on the blog of Sara, which can be seen here. The challenge is to have a big picture or title on a project. I printed my picture at 8 1/2 x 11".


For this layout I used Plantin Schoolbook for the title, cut at 1.75". The large flowery cuts are from Sophie and were cut at 4 and 4.5". The smaller flower on top was cut using Stampin Up punches and a pearl brad. The butterflies and the pieces at the top right corner were also cut with Stampin Up punches.

Sunday, May 5, 2013

Down on the Farm layout - NSD project #3 & 4

A layout for my sister who went to the Donkey Derby WITHOUT ME! Shame on her, but I still love her!

This challenge was to use a barnyard animal. I knew exactly which pictures to use because my sister just posted these donkey photos on her facebook page.


For all the Cricut cuts except for the title I used the Cricut Circle Exclusive Pop Up Neighborhood.


For the title I used Boys will be Boys. I also used some buttons and some twine on the layout.


I will also add this layout to another challenge to add dimension to your items, posted by Nadia at With Glittering Eyes blog. Instead of leaving my pieces flat I used lots of pop dots, buttons and inking to make everything stand out a little more. I did the same process on all the pieces of this layout. The tractor above is 'before' any manipulating. The tractor below is 'after'.

National Scrapbook Day Weekend - Project 1

One of my projects for today.... a Mother's Day Layout. Stay tuned for more projects through out the rest of today and tomorrow.


For the pennants, scallop circles, scallop border and labels I used Stampin' Up punches. I really love how easy it is to grab a punch and get the shape I want.


For Happy Mothers Day I used the Cricut cartridge Quarter Note. That is my favorite font for welding pretty letters together.


The challenge on the Cricut Circle messageboard was to pick three items in a row from a tic tac toe board. I chose to use a flower image, buttons and ribbon (instead of ribbon I used twine though). I also used my Gypsy to weld, bling and brads which were in some of the other boxes to choose from. So I guess I used a row going down in the first column and a row going horizontal on the bottom from the challenge.


Blessed are the children of scrapbookers, for they shall inherit the scrapbooks.